Help Files
Now you downloaded a Trial version, which could give you 30 days free trial period.
As one of the earliest Sightline Media products, CommonPhotoStar is a dynamical visual presentation tool well known in the world.
The newest v4.6.3.3 mainly supports Windows XP and 32 bits Windows 7.
Now let's learn about how to use this software.
1. Install, Startup, Import picture files
1) First you should install it. Default path is recommended. Take care to delete the previous versions of Sightline Media products if there is any. Delete them through Control Panel. After that, you can delete CommonPhotoStar folder manually if there is such a folder.
2) Since the software is programmed with C++ language, with very effective low-level code, the installation process is very fast, could complete in an instant.
3) To start running the program, you can double click the CPS icon on the desk top, or choose Start -> All Programs -> CommonPhotoStar.
4) After starting up, click Find Album Left (the third tool button from right),the 0 folder of the default album will be opened.
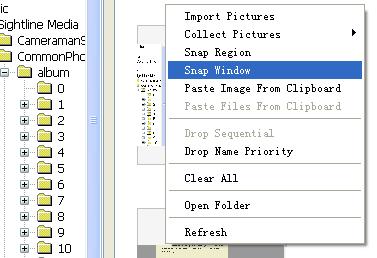
5) Now by clicking the right button of the mouse in the left list box, a context menu will pop up.
6) Choose in the context menu Snap Window command, the interface of the software will be minimized and a flickering box occurs. Now you can move the mouse to choose your required window for clipping. On selected your window just click the left button, the software interface will appear again, and the image of the window you chose is displayed in the list box area of folder 0 (you got a file named 0.bmp in the folder). Congratulations!
7) By choosing in the context menu Snap Region command, the software interface will be minimized, and the mouse cursor is shown as a cross shape, now press down the left button of your mouse, keeping pressed and moving the mouse to draw a box on the area you want to snap image from. Release the button and the software interface appears again, now the image of the area you chose appears in the left list box area of folder 0 (you got a second file named 1.bmp in the folder). Congratulations again!

8) Besides the snapping way described above for getting image files, you can also use the existing BMP/JPG/PNG image files in your computer.
9) Now let's click the subfolder 1 of the album in the left navigation tree. There are no files yet in the folder.
10) Click the "+" on the left side of the C: disk or D: disk from the right navigation tree, the sub folders in your local machine disk are expended. Here we suppose expended D: disk.
11) Choose by name your required folder, which contain picture files, e.g., D:\Pics, now all the thumbnails in the Pics folder are displayed in the right list box.
12) You can copy or drag the image files required to the left list box for your album. While copying, use the right button context menu Copy command for a single picture, or use the right button context menu Files -> Copy command for multiple selected image files, for pasting you move the mouse to the left list box and choose from the right button context menu Paste File From Clipboard command.
13) It's also possible getting image files by cropping image pixels, e.g., via other programs such as MS Paint, opening an image file, choosing an area of the image by drawing a selection box and copying into the clipboard; then paste into the left list box of your album at CommonPhotoStar by choosing from the right button context menu Paste Image From Clipboard command, thus generated a new image file in the album subfolder.
14) You can also import local machine picture files by Open Files dialog box. To do that just choose from the right button context menu Import Pictures command, the Open Files dialog will be shown, then you can locate via the dialog the folders containing image files in your PC and import an image file or import multiple BMP/JPG/PNG files.
15) Through the above learning process, you have already understood the basic operations of getting images. Now you have got quite a lot of image files in your album subfolders named 0/1/2... I believe.